

 Mini Excavator Controls Explained: A Complete Guide for Beginners and Operators
Mini excavators are among the most useful pieces of equipment on today’s job sites. Their compact size, powerful hydraulic systems, and ability to work in tight spaces make them essential for landscaping, trenching, construction, utility work, demolition, and many other tasks. Even though they are smaller than standard excavators, mini excavators are highly capable machines that can handle a wide range of jobs with impressive precision and efficiency.
For many first-time users, however, the controls of a mini excavator can seem confusing. Sitting in the operator’s seat for the first time often feels overwhelming. There are joysticks, pedals, levers, switches, warning indicators, and hydraulic functions that all appear to demand immediate understanding. To someone unfamiliar with heavy equipment, the setup can feel far more complicated than expected.
The good news is that mini excavator controls are not as difficult as they first appear. Once you understand what each control does and how the machine responds, operating one becomes much more logical. In fact, most mini excavators are designed to be intuitive after a short period of learning and practice. The key is to understand how the boom, stick, bucket, swing, tracks, blade, and auxiliary hydraulics are controlled, and how these functions work together during real tasks.
This guide will explain mini excavator controls in a simple and practical way. It is designed for beginners, renters, buyers, DIY property owners, and anyone who wants a clear understanding of how these compact machines work. We will cover the meaning of excavator controls, the main control types, control patterns, safe operation basics, practical usage tips, and frequently asked questions. By the end of this article, you will have a much stronger foundation for understanding how mini excavators are operated and what it takes to use them safely and efficiently.
What Are Mini Excavator Controls?
Mini excavator controls are the system of levers, joysticks, pedals, switches, and buttons that allow the operator to move and manage every major function of the machine. These controls send commands through the hydraulic system, which powers the boom, arm, bucket, swing frame, tracks, dozer blade, and any attachments connected to the machine.
In simple terms, the controls are what turn the mini excavator from a parked machine into a working tool. Without understanding them, the operator cannot dig, lift, travel, grade, backfill, or use accessories such as augers or breakers.
Most mini excavators include the following main control groups:
- Two joysticks for digging and upper structure movement
- Travel pedals or travel levers for moving the tracks
- A blade control lever for raising and lowering the dozer blade
- Switches and buttons for throttle, lights, horn, and auxiliary hydraulics
- A safety lock or control shutoff lever
- Gauges and indicators on the dashboard
While the exact layout may vary depending on brand and model, the general control system remains similar across the industry. That is why once an operator understands the basics, learning new models becomes much easier.
Why Understanding Excavator Controls Matters
Learning mini excavator controls is about much more than just making the machine move. It affects safety, productivity, work quality, and machine life. A skilled operator can do more work in less time, with better accuracy and less wear on the equipment.
The biggest reason to understand the controls is safety. Mini excavators may be compact, but they are still powerful machines that can cause serious injury or damage if used incorrectly. A wrong movement near a trench, building, utility line, or co-worker can create immediate danger. Understanding the controls reduces sudden mistakes and helps the operator react correctly in the moment.
Control knowledge also improves efficiency. Operators who know how to coordinate the boom, stick, bucket, and swing can complete digging cycles much faster. Instead of making stop-and-go movements, they work in smooth motions that save time and fuel. This matters on professional job sites where productivity affects cost and project deadlines.
Precision is another major benefit. Mini excavators are often used for detailed work such as trenching near utilities, grading around foundations, or working in narrow residential spaces. Good control understanding allows the operator to make small, accurate movements instead of rough motions that create extra cleanup or rework.
Finally, smooth control use helps protect the machine. Abrupt swinging, hard stops, careless track movement, and aggressive digging can increase wear on hydraulic components, pins, bushings, and the undercarriage. Better control habits support longer equipment life and lower maintenance costs.
Main Mini Excavator Controls Explained
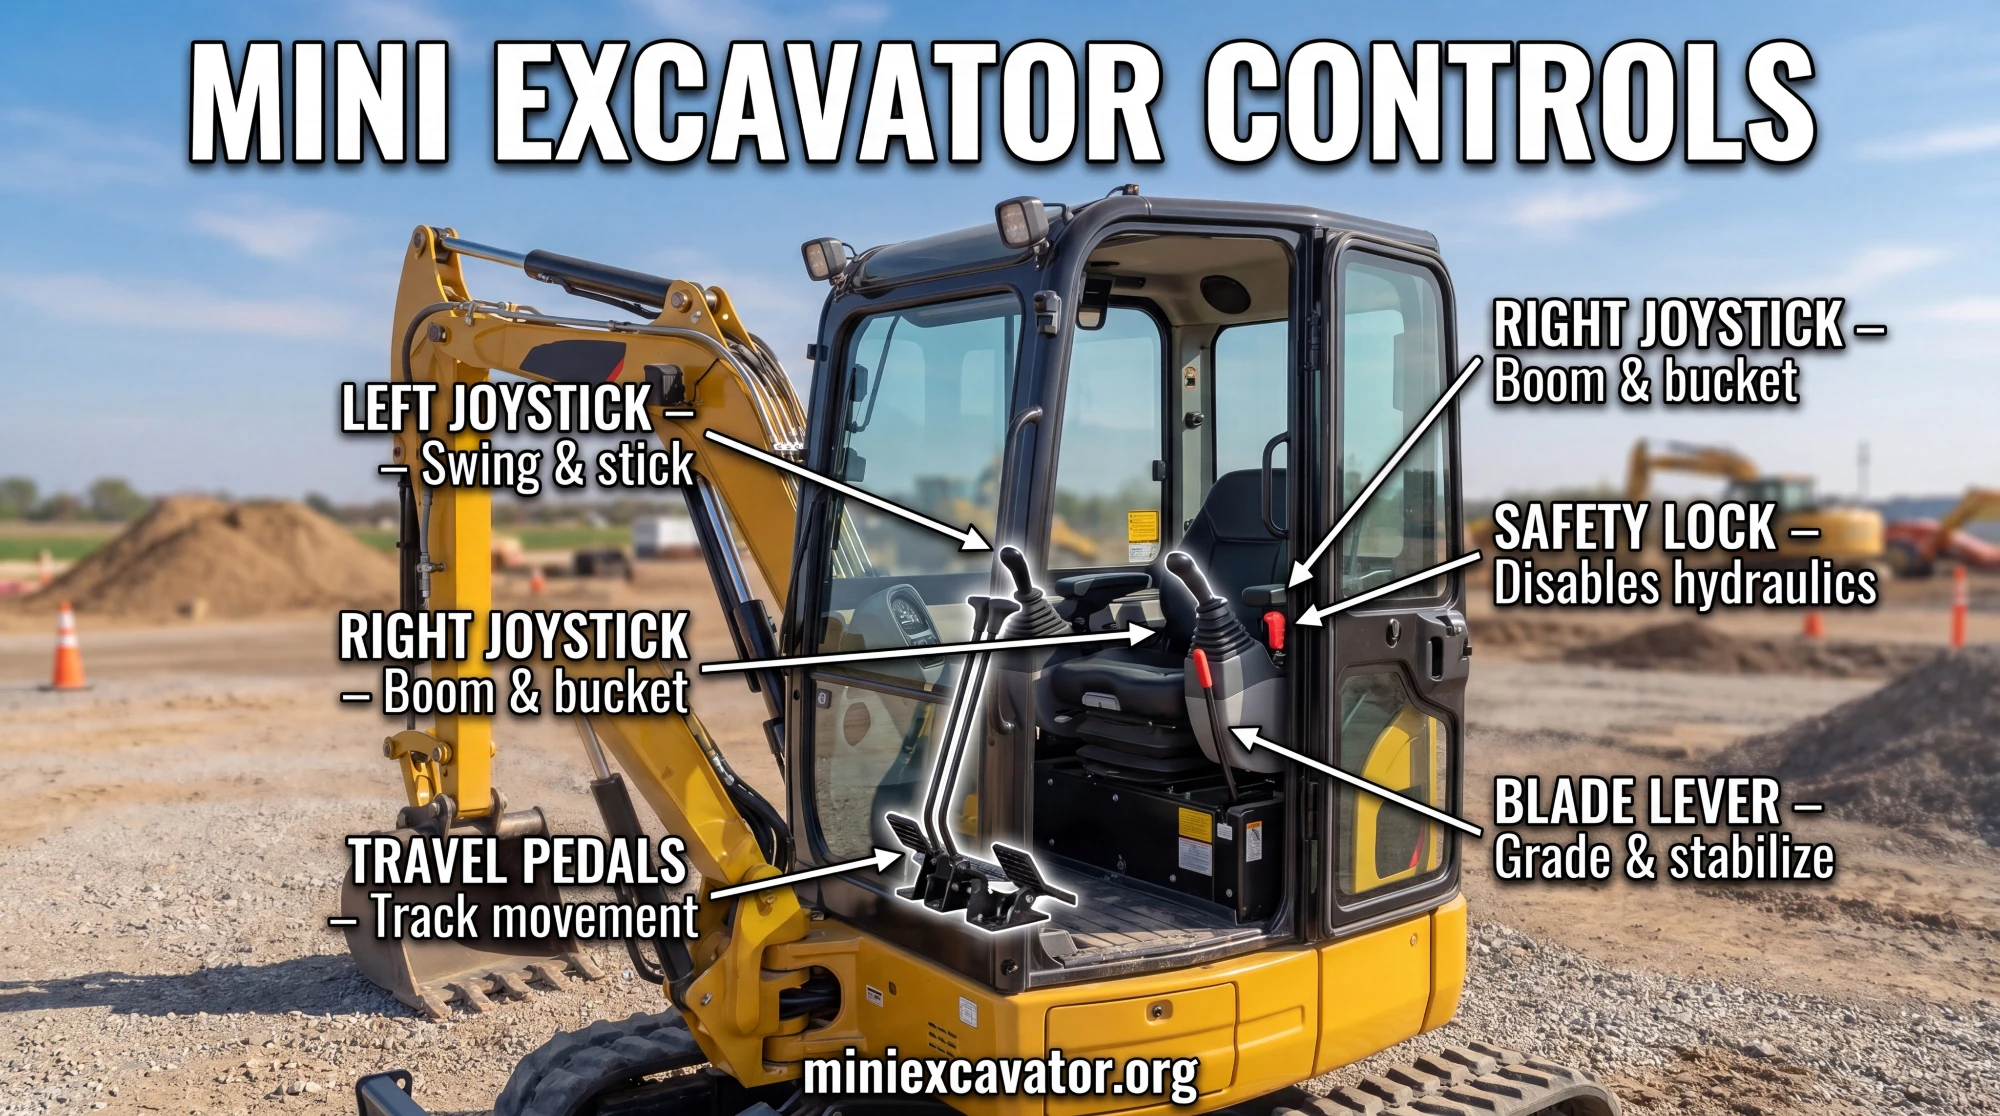
1. The Joysticks
The joysticks are the primary controls used for digging and upper body movement. They usually sit on the left and right side of the operator’s seat and control four essential actions:
- Boom up and down
- Stick in and out
- Bucket curl and dump
- Cab or upper structure swing left and right
These joystick movements are the heart of mini excavator operation. Most machines use pilot controls or electronic-hydraulic controls, meaning the joysticks do not directly move heavy mechanical linkages. Instead, they signal the hydraulic system to perform the selected action.
Because mini excavators depend so heavily on joystick use, a new operator should spend time learning how each direction affects the machine. Even small joystick movement can produce noticeable machine response, especially at higher engine speeds.
2. Travel Controls
Mini excavators move on rubber or steel tracks, and the travel controls manage this motion. Depending on the model, travel may be controlled by foot pedals, hand levers, or a combination of both.
Pushing both tracks forward moves the machine forward. Pulling both back makes it reverse. Pushing one track more than the other turns the machine. Moving one forward and one backward can spin the excavator in place.
Travel control seems simple at first, but it becomes more important when working on uneven ground, narrow paths, or tight job sites. Operators must always remain aware of the blade position and machine orientation because track movement feels different depending on which direction the upper structure is facing.
3. Blade Control Lever
The front dozer blade is an important part of the mini excavator. It is commonly used for light grading, backfilling, clearing loose material, stabilizing the machine, and helping during transport or setup.
The blade lever raises and lowers the blade. While many beginners think of it as a secondary feature, experienced operators know that the blade is critical for stability. Lowering it during digging helps anchor the machine and improve balance, especially when working on rough surfaces.
4. Auxiliary Hydraulic Controls
Mini excavators can often power different attachments beyond the standard digging bucket. These include:
- Hydraulic breakers
- Augers
- Grapples
- Hydraulic thumbs
- Compactors
- Rippers
Auxiliary hydraulic controls are usually located on joystick buttons, thumb rollers, or dedicated switches. These controls send hydraulic flow to the attachment. The exact function depends on the accessory being used.
If an operator plans to use attachments, understanding auxiliary controls is essential. Using the wrong hydraulic setting or activating the function improperly can damage both the machine and the attachment.
5. Safety Lock and Dashboard Controls
Most mini excavators have a safety lock lever, often attached to the armrest or side console. When lifted, this lock disables hydraulic functions to prevent accidental movement. Before exiting or entering the machine, the operator should always use the safety lock.
Dashboard controls usually include engine start, fuel gauge, temperature indicators, warning lights, work lights, throttle settings, horn, and sometimes monitor screens for diagnostics. These systems may not control digging directly, but they are important to overall safe operation.
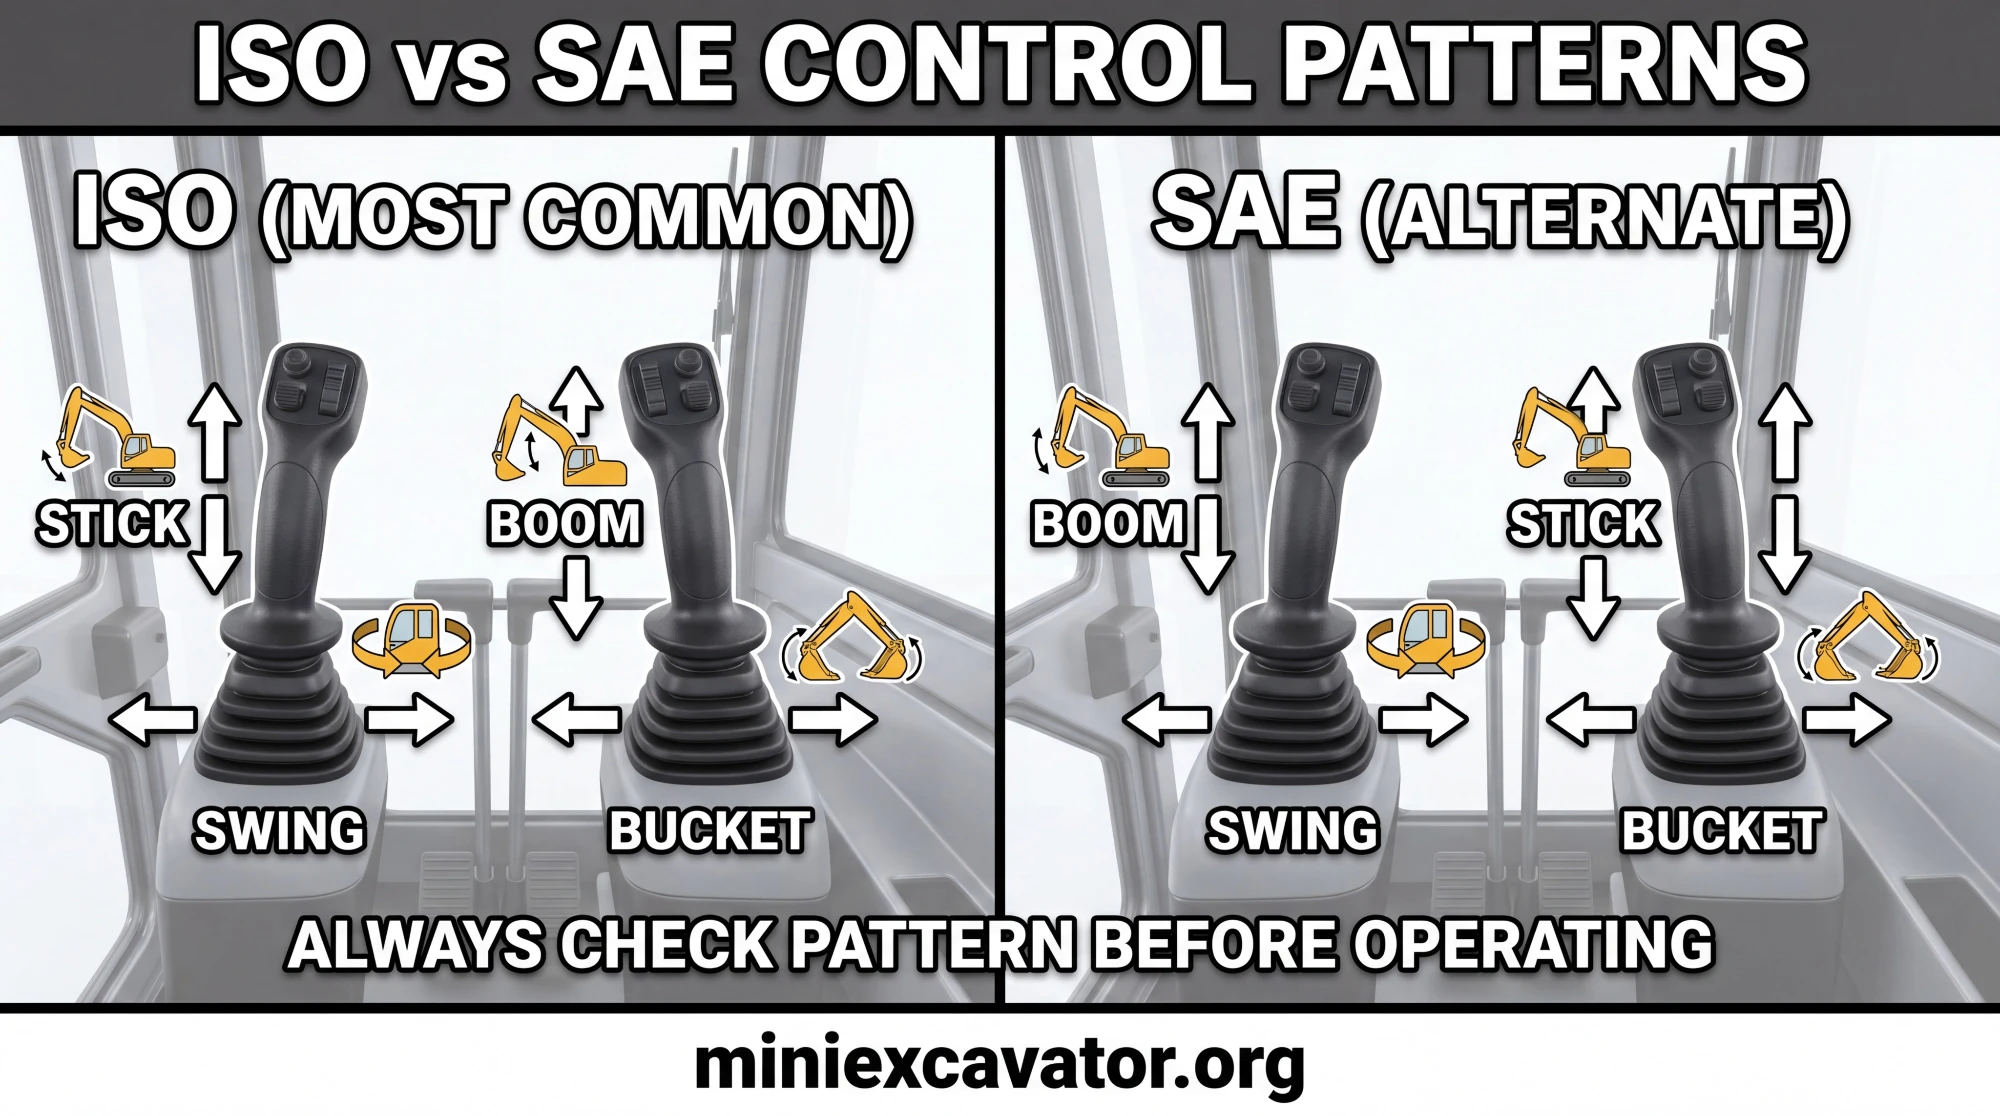 Understanding Excavator Control Patterns
One of the most important things to understand is that mini excavators may use different control patterns. The two most common are ISO and SAE.
ISO Pattern
In the ISO pattern:
- The left joystick controls stick in and out, plus swing left and right
- The right joystick controls boom up and down, plus bucket curl and dump
This is one of the most widely used control layouts in the industry.
SAE Pattern
In the SAE pattern:
- The left joystick controls boom up and down, plus swing left and right
- The right joystick controls stick in and out, plus bucket curl and dump
The main difference between ISO and SAE is which joystick controls the boom and which controls the stick.
Some mini excavators have a pattern changer that allows the operator to switch between layouts. This is especially useful on rental equipment or mixed fleets. Before using any mini excavator, the operator should verify the pattern. Never assume the controls are set the same as the last machine you used.
How Beginners Should Start Learning Mini Excavator Controls
The best way to learn is through a structured approach. Beginners should avoid rushing and focus on simple understanding before real job work begins.
First, read the operator’s manual. Every machine has its own layout, safety requirements, fluid specifications, and operating procedures. The manual provides the most accurate reference for that model.
Second, perform a full walk-around inspection before starting the machine. Check for leaks, loose parts, attachment condition, track wear, blade condition, and worksite hazards. This habit should happen every time the excavator is used.
Third, sit in the cab with the machine off and identify every major control. Learn where the joysticks, blade lever, travel controls, throttle, ignition, safety lock, and auxiliary buttons are located. Basic control familiarity before engine startup reduces confusion later.
Fourth, start with slow movements in an open area. Practice each function by itself:
- Raise and lower the boom
- Pull the stick in and push it out
- Curl and dump the bucket
- Swing left and right
- Move the blade up and down
- Travel forward, backward, and turn
Once those actions feel familiar, combine them slowly. For example, raise the boom while curling the bucket, or extend the stick while swinging. Smooth combined movement is what turns basic control knowledge into real operating skill.
 Best Practices for Smooth and Safe Operation
A few good habits can make a huge difference when operating a mini excavator.
Always start slowly. Sudden, jerky movement is one of the most common beginner mistakes. Hydraulic systems respond best to steady input. Smooth controls improve precision and reduce machine stress.
Keep the machine stable. Use the blade when needed and avoid making aggressive movements on unstable or sloped ground. If carrying a load, keep it low to maintain a lower center of gravity.
Stay aware of surroundings at all times. Watch for people, obstacles, trenches, retaining walls, and power lines. Mini excavators are compact, but the upper structure swings wider than many new operators expect.
Use smooth digging cycles. Efficient operators do not treat every function as a separate step. They blend boom, stick, bucket, and swing motions together. This saves time and creates better work results.
Respect machine limits. Mini excavators are strong, but they still have lifting limits, reach limits, and stability limits. Trying to lift oversized loads or work beyond safe angles can create rollover risk or equipment damage.
Use attachments correctly. Always make sure the machine is compatible with the attachment, and verify hydraulic requirements before operation.
Common Mistakes New Operators Make
Many beginners make similar errors when first using mini excavators. Knowing these common mistakes can help prevent them.
One common mistake is not checking the control pattern before operation. Even experienced operators can make serious errors if the boom and stick controls are reversed from what they expect.
Another frequent mistake is moving too aggressively. New users may overcorrect or push controls too far, creating sudden motions that reduce accuracy.
Poor travel awareness is also common. Operators sometimes forget that travel direction relates to track orientation and blade position, which can create confusion when the upper body is rotated.
Some beginners ignore the blade or fail to use it for stabilization. This can reduce digging efficiency and increase machine movement.
Others focus only on the bucket and forget about machine position. Proper excavator use depends on the entire machine setup, not just the end of the arm.
Practical Examples of How Controls Work Together
To really understand mini excavator controls, it helps to picture real work scenarios.
When digging a trench, the operator may lower the boom, pull the stick inward, and curl the bucket at the same time to fill the bucket efficiently. Then the operator raises the boom while beginning the swing movement toward the spoil pile. Once in position, the bucket is dumped, and the machine swings back to repeat the cycle.
When grading, the operator may use slow boom and stick adjustments while keeping the bucket angled carefully to skim the ground surface. The blade may also be used for rough leveling before final finishing.
When loading material, the operator needs smooth lift and swing control, careful bucket positioning, and awareness of the truck or dump point. In these situations, small control mistakes can waste time or spill material.
These examples show that excavator operation is not about one control at a time. It is about coordination.
Frequently Asked Questions About Mini Excavator Controls
Are mini excavator controls hard to learn?
They may seem difficult at first, but most people can learn the basics fairly quickly with proper instruction and practice. The layout becomes much easier once the operator understands what each joystick and lever controls.
What is the difference between boom and stick?
The boom is the larger main arm section connected to the machine. The stick, sometimes called the dipper arm, is the second section connected between the boom and bucket. Both work together to position the bucket.
Why do some excavators feel different from others?
Different brands and models may have different control patterns, hydraulic responsiveness, cab layouts, and operating weights. Some are smoother, faster, or more sensitive than others.
Can I learn mini excavator controls without professional experience?
Yes, but safe learning is important. Reading the manual, practicing in an open area, and getting guidance from an experienced operator is the best approach. For professional job site work, proper training is strongly recommended.
What is the safety lock for?
The safety lock disables hydraulic controls when the operator is entering, exiting, or not actively operating the machine. It helps prevent accidental joystick or pedal movement.
Do all mini excavators have auxiliary hydraulics?
Not all, but many do. Auxiliary hydraulics are common on machines designed for multiple attachments. Always check machine specifications before assuming an attachment can be used.
How can I get smoother with the controls?
Practice is the main answer. Focus on light joystick input, slow coordination, and repeated movement patterns. Smooth control comes from consistency, not force.
Conclusion
Understanding mini excavator controls is the foundation of safe and productive machine operation. While the cab may look complicated at first, the system becomes much easier once you break it down into its core functions. The joysticks control digging and swing movement, the travel controls move the tracks, the blade lever manages stability and grading support, and auxiliary hydraulics operate attachments. Beyond that, control patterns such as ISO and SAE help explain why different machines may feel different even when they perform the same tasks.
For beginners, the most important thing is to learn slowly, verify the control pattern, read the operator’s manual, and practice in a safe area. For operators who already have some experience, improving control coordination, machine awareness, and smooth movement can greatly increase productivity and work quality.
Mini excavators are powerful, precise, and highly versatile. With the right control knowledge, they become far less intimidating and far more useful. Whether you are renting one for a home project, buying one for a business, or simply trying to understand how these machines work, learning the controls is the first step toward using a mini excavator with confidence.